
Investigation 3 - Living and Non-Living Things in the Water
| Class Time Required |
Activity 3A: 1 class period |
| Materials Needed |
|
| Teacher Preparation |
Prepare puzzles Print the photos and description of the pseudoscorpion. Print the small picture. Compile resources and materials. Print, copy and fold mini-books. Prepare class book pages with the words printed out. Cut, sort and organize textured materials. Gather, prepare, and organize art materials for murals. |
| Prior Student Knowledge |
Information from previous lessons with plankton and microscopic creatures. Experience with animals such as class pets, and with a variety of living and nonliving things in the aquatic environment. Experience with glue or glue sticks. |
| Vocabulary |
aquatic, balance, body, bristles, change, claws, color, develop, environment, feel, grow, jaws, legs, living, look, move, mural, oval, non-living, phytoplankton, pincers, segments, shape, size, texture, zooplankton |
| Science GLEs Addressed |
A2, C2, C3 |
 Overview: In this 6-9 day investigation, children assemble simple puzzles to learn more about aquatic animals and their life cycles. They look closely at the parts of a small aquatic animal with a listening and drawing activity, then learn to describe and explain the things in aquatic environments by making mini-books, a class book, and a large class mural.
Activity 3A: Aquatic Puzzles
(1 class period)
Focus Questions: How do we know living and nonliving things are in the water around us? What do they look like when they are growing?
Engagement (5 minutes):
Introduce the tiny creatures of our blue planet by making a dot with a pencil on a piece of paper. Explain to students that this is how big the animals are, that they will be looking at and studying through books, puzzles, and investigations. Remind them that through earlier investigations they found out about plankton and how they feed bigger animals. Explain that they will now look at the characteristics of these living creatures!
Exploration (20 minutes):
Show the students a full puzzle. Explain that when the puzzle pieces are assembled and lined up they show how one creature develops, from zooplankton (stage) to adult animals.
Macro-micro freshwater puzzles
Ask the students, "What do you notice about the zooplankton stage of the animal?"
Show a variety of puzzles and support students’ vocabulary.
Distribute the two-part puzzles of marine or freshwater animals for students to assemble.
Students will notice and describe the difference between the 2 stages of development.
On the bottom of each puzzle is a simple sentence. I am a _______. Children may practice recognizing the different animals and checking the sentence to see if they are correct.
Explanation (at same time as Exploration):
Have students explain their thinking by showing the puzzle piece and identifying the characteristics of each creature. They can notice the size, shape, and possible features of the animal that help it move in an aquatic environment. Rather than just putting the puzzles together, the children need to be supported to notice specific characteristics as they work on the puzzles.
Using the question "what is your evidence?" will support students to recognize the need to explain their thinking.
Elaboration (ongoing):
Give students opportunities to continue putting these puzzles together during activity center time. In this way, children will explain their thinking to their peers and connect it to other activities and games they are playing. Students could also make connections of other developing animals they are familiar with, applying it to classroom pets (fish, turtles, doves) and/or family pets or themselves. Having large paper available in the classroom and paper at the easel for drawing and painting, along with posters of life cycles of aquatic animals, will assist children to make these connections.
Evaluation:
Listen to student’s thinking and document understanding with a checklist. Misconceptions and/or misunderstandings of developing creatures can be addressed through small group discussion or by bringing it back to a large group discussion about the use and understanding of the puzzles.
Activity 3B: Drawing from Description
(1 class period)
Focus Question: What parts of an animal make it special?
Engagement (10 minutes):
Hold a small, simple object (toy, block, etc.) in your hand or in a bag and explain that you will describe it without showing it.
The students will draw a picture of it in the air (using their finger as a sky-writer) as they hear words that describe it. Use simple descriptions at first so that everyone is successful: "It is round," "It has four lines," "It is smaller than my hand," etc.
Ask the students to be scientists, using the clues to draw the object and think about what it could be.
Let them know they will be doing a drawing activity, and they are only going to get an oral description so they will have to listen carefully!
Exploration (20-30 minutes):
Explain that without looking at a picture, the students will be drawing a creature.
Guide the students through a drawing discovery activity:
Ask everyone to open their science notebook to a clean page. Explain that you will ask students to draw one part at a time of a special creature. The students will have to listen carefully.
Read the drawing directions:
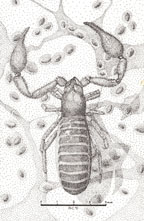
- I have 2 parts. One is big and the other is smaller. They are oval in shape. Draw 2 body parts! (You may provide scaffolding by giving more information—put one oval near the side of your paper, draw another oval so that one side touches the first oval.)
- The small body part has a pair of biting jaws. Draw them. (You can demonstrate with your finger and thumb, moving back and forth.)
- The small body part has 2 pincers. Draw 2 pincers. (You can demonstrate by moving hands and thumbs together, describing the pincers coming out of the small oval.)
- Put tiny bristles on both pincers (little lines).
- The small body part has 4 pairs of walking legs. Draw the 4 pairs of walking legs.
- Each walking leg is armed with claws. Draw claws on each walking leg. (Again, a visual image of fingers shaped to look like claws may be helpful.)
- The large body part has 12 segments. Make 12 segments (lines) on your animal.
Now your creature is complete—does it look like a living animal?
Explanation (10 minutes):
 Have children pair up and share the animals that they drew in their science notebooks.
Then, show the drawing of the pseudoscorpion (they are less than 1/3 of an inch long).
Read a description of the pseudoscorpion from one of these sources:
Utah State University Extension
Description of pseudoscorpions from Penn State College of Agricultural Sciences
If you have the book,The Nature of Southeast Alaska, there is a interesting description of the pseudoscorpion!
Elaboration:
Give each student a small drawing of a pseudoscorpion that matches the size of the science notebook. Students can glue this in their science notebook next to their own drawing. Have children compare their drawing to the scientist’s drawing. Some students may go on to label each part or write a short description of the pseudoscorpion.
This activity could be repeated with an animal or plant description that is very common to the local area. Students will have the opportunity to continue to practice listening and drawing skills.
Evaluation:
Notice children who are able to draw from oral description, and those who may need more experience with the vocabulary that describes a pseudoscorpion.
Extension:
Allow children to practice giving clues to others for drawing.
Activity 3C: How Does It Look and Feel?
(1-2 class periods)
Focus Question: What words can you use to describe this aquatic living or nonliving thing?
Engagement (15 minutes):
Read a book specific to the living and nonliving things in your aquatic environment. Books with simple text and photos, such as those published by Heinemann, are useful. Possible books are listed in the Bibliography and Resources section for this unit. Have children notice the photos and/or illustrations, and talk about what they see and what words they can use to describe it.
Model the use of the sentence "I see a …"
Model first using one describing word and eventually two describing words such as a color word and a texture word. For example; "I see a soft green anemone." Use a pocket chart to model matching words with the picture, and/or display a photo or drawing of the anemone (or other local creature) along with the sentence strip. Model both a living thing and a nonliving thing. You might also model the characteristics with the pocket chart, and sort them by color, shape, and size. The pocket chart could be used as a "word bank" for children to have support with writing their mini-book.
Exploration (20-30 minutes):
Children will use their experiences with both living and nonliving aquatic things to make a mini-book. By this time there should be books, posters, drawings, science notebooks and other resources around the room to use for getting ideas. These mini-books will focus on shape, size, and color. Children may start their book with illustrations and/or with words. The teacher emphasizes that the pictures must match the words. For example: "I see a red sea star." "I see an oval limpet." "I see a large sea anemone." "I see a dark rock." "I see squishy mud." "I see a white barnacle." "I see a ______." "I see a _____."
Students write and draw something unique that they see. They can start with one descriptive word and extend to two, such as "I see a large white barnacle." The teacher may want to decide how many nonliving things to put in the book to support comparison and contrast of living and nonliving things.
Explanation (10 minutes):
After children have finished their book they can read and share their book with a friend. Provide support for the children to compare and contrast the things they chose to put in their book: "What is the same?" "What is different?" "How many are living?" "How many are nonliving?" Challenge children to come up with more than one way that they can know if something is living or nonliving. Some children may want to make more books.
Elaboration (15 minutes):
Gather students as a large group (or smaller groups if they are finishing at different times). Ask them to discuss their ideas of living and nonliving things in aquatic environments. Mini-books can be compared and a class list of all the living and nonliving things in the books can be made. If desired, put all of the items on tagboard (using both the word and a child-drawn picture) so that students can move them on a pocket graph, noting which is living and which is nonliving and then explaining how they know. These same cards could also be used for a graph of how living things move—legs, fins, tail, etc. This could become an independent center to encourage use of the vocabulary and understanding of the characteristics.
Evaluation:
Students will be able to show their understanding of a variety of characteristics in an individually made and colored mini-book. Use authentic assessment, having children read their books to the teacher or a peer. A checklist may also be used to note which students are able to match pictures to the words, and which children are able to sort nonliving and living things on the pocket chart.
Activity 3D: Our Book about Things in the Water
(1-2 class periods)
Focus Question: How can you describe the characteristics of this living or nonliving thing?
Engagement (10 Minutes):
Pass an object around the group, and ask children to describe how it feels. Use their words to model describing sea creatures or other aquatic living or nonliving things. Use objects from the local area such as rocks, shells, bark, sticks, feathers, leaves, etc.
For example, to describe a scallop shell: "Bumpy," "smooth," "sharp edges."
Ask the children "What kinds of materials could we use to show that in a book?"
Paper, fabric, and other materials will be used to create a class book that supports children’s use of descriptive words.
Exploration (30-40 Minutes):
Students will work in pairs to create a page for the class book. Using photos, magazine cutouts, or drawings of local living and nonliving things, children then describe how the thing would feel. They choose a material with an authentic texture.
For example, cardboard = bumpy (shell or a sea creature), sea star = sandpaper, bird = feathers, fish = scaly fabric.
Each pair will use a page that already has words printed on it, taken from the previous lesson. Students can then read the words and add their drawing and texture. Brainstorm additional textures for living and nonliving things, including lots of repetition.
Pages for the class book can be as follows:
Page 1: You can learn by looking.
Page 2: You can learn by touching.
Page 3. The sea star looks rough.
Page 4. This feels rough.
Page 5. The ______looks smooth. (shell) ?
Page 6. This feels smooth.
Page 7. The ______looks hard. (rock) ?
Page 8. This feels hard.
Page 9. The ______ looks bumpy. (barnacles) ?
Page 10. This feels bumpy.
Page 11. The _____looks soft. (feather) ?
Page 12. This feels soft.
Last page: Can you remember the way each thing feels?
Explanation (20 minutes):
As students work together on their page, they talk with each other about how they will use materials to show and demonstrate the texture. When the whole class reads the book together, each team will be able to explain their thinking to the group. If someone disagrees with the material they used, the teacher supports the team to defend their thinking.
Elaboration:
When students have finished their pages, they can make their own small book or an additional page for the class book.
Evaluation:
Note the ways students are able to work together, learn from one another, and show their understanding on the class book page. Also note the students’ ability to talk about their work and identify how they knew about their chosen item on the page (past experiences, books, film, television, etc.).
Activity 3E: Making a Mural
(2-3 class periods)
Focus Questions: How do we know living and nonliving things are in the water around us? How can we show this to others? How can we share our learning with others?
Engagement (20 minutes):
Tell the children they are going to create a mural of an aquatic environment to teach others about their experiences and learning. Ask them to name all the living and nonliving things they can think of that are a part of an aquatic environment.
This could become:
- An interactive writing activity to engage more learners. Share the pen with children as they write the letters and/or words they know. Keep this part of the lesson going by providing paper and/or white boards to other children to keep them writing and engaged at the same time. Everyone gets an opportunity to add to the big class list.
- A roleplay of creatures or nonliving things. Children can act out the thing while others guess what it is, giving their explanations of how they know. For example, a child sits still and doesn’t move for a rock, or moves their fins to be a fish.
Support students to make a choice of how they will represent their living or nonliving thing. Explain how paints, markers, paper for sculpture, and/or bags for puppets might be used. Children will start with a first choice and then later they can self-choose an additional item or a way to add color or texture to the mural.
Exploration (45 minutes to one hour):
The aquatic environment may be a tide pool, lake, river, puddle, or something that is specific to their local experiences. Allow students choices of making living and nonliving things for that environment. Set up the classroom to have students work in small teams; some will work on the mural background while others cut and draw aquatic creatures, and others make rocks, sand, or mud. Place aquatic resources around the room (photos, magazines, books, and posters, etc.). Encourage the students to make textures by placing sand in the paint for sea stars, or supply a variety of fabrics with textures for students to create plants and animals with. Finger paints can be used for the background. Use large sheets of paper and cover a large area on the floor with a shower curtain to make a work area. Movement of water can be made with lines and movement of the hands. Paper in strips with paper fasteners can be used for sculptures with moving parts. Paper bags can be used to make puppets. Colorful paper can be used to make streamers in the classroom to simulate seaweed or kelp. Newspaper can be used for stuffing paper sculptures of larger rocks and/or living things. Once the living and nonliving things have been painted and dried they are attached to the mural with tape or in some other way.
As an example, a tide pool mural might include rocks, sand, mud, small fish, crabs, sea anemones, limpets, clams, seaweed, and sea stars. Some children may want to add gulls or other birds that get their food from an aquatic environment. This adds to the complexity of the art lesson, and adds ideas to make for a richer discussion.
Explanation (20 minutes):
When the mural is nearly done, children can gather to show their additions to each other. Support the students to use aquatic vocabulary along with describing words. Questions such as, "Why did you put your sea star in this place? or "How did you know where to put the rocks?" will support children to explain and defend their thinking with visual evidence.
Later, students can notice many of the things on the mural and explain their thinking of how they chose color, texture, size, and shape. This is good practice for presenting to an audience, as they will do during the culminating activity later.
Elaboration:
As students finish their work on the big mural they can create their own individual tide pool and/or river environment, using art materials and supplies. Or, they could help a friend finish a part of the project. Children can read, write, or draw as they finish, letting others finish before everyone helps with the cleanup and once again gathers as a large group.
Evaluation:
Gather the children together as a large group, or in smaller groups if some children need more time to finish their work. Use a checklist or a record of how children are able to explain their placement of a nonliving or living thing on the mural. Individual tide pools or other aquatic environments also provide evidence of understanding. Note which children are able to use their descriptive language independently and which children might need more support.
Teacher Preparation:
|
Tips from Teachers |
|
Use whiteboards instead of notebooks for the drawings from descriptions. This helps alleviate some of the pressure to make drawings 'perfect' if you have perfectionists in your class. This also lets students play more with drawing from descriptions, without worrying about materials. |
Read through the Teacher Background information.
Make several 2- or 3-part puzzles showing life cycle stages of aquatic animals, for Activity 3A.
Larval to adult marine puzzles
Larval to adult freshwater puzzles
If it is known that the class may have challenges with the drawing activity in Activity 3B, prepare templates of ovals, pincers, walking legs, etc. The children could then use these shapes to trace and put together the pseudoscorpion so they can be successful. Later a different creature could be drawn from oral description.
Print (or prepare to project) the drawing and print the description of the pseudoscorpion to read to students. Copy the small drawing of the pseudoscorpion for each science notebook.
Compile resources including books, posters, and aquatic objects.
Create a mini-book with pages relevant to your area, or copy and fold the mini-books provided here for students to complete in Activity 3C. Mini-book folding instructions.
For Activity 3D, cut, sort, and organize fabrics to represent textures.
Prepare class book pages with printed words.
For Activity 3, have large pieces of paper along with smaller colorful paper to use.
Make tempera paints accessible, with large brushes. An assortment of sculpture materials can be sorted into small boxes or containers: wire, toothpicks, pipe cleaners (chenille sticks), popsicle sticks, cellophane, etc.
Curricular Connections:
Math. The drawing lesson may help students develop spatial sense. Activity 3C provides practice in sorting.
Language Arts. Students read sentences and match words to pictures, draw, write, and use descriptive language. They develop listening skills and give oral descriptions.
Art. Students experience drawing, develop a sense of space, and use color, shape, size, texture, representation, and design. They use a variety of materials.
| Student Handouts |
Science notebooks Notebook-size copy of pseudoscorpion picture |
| Items for Group Display |
Class Book pages Resource books, posters, pictures, ID charts Picture and description of pseudoscorpion |
| Material Items |
|
| Facility/Equipment Requirements |
Work space for creating a large mural |
Alaska Science Grade Level Expectations Addressed:
In Investigation 3, kindergarten students begin to build toward these K-12 standards:
Science as Inquiry and Process
(A2) develop an understanding that the processes of science requires integrity, logical reasoning, skepticism, openness, communication, and peer review.
Concepts of Life Science
(C2) develop an understanding of the structure, function, behavior, development, life cycles, and diversity of living organisms.
(C3) develop an understanding that all organisms are linked to each other and their physical environments through the transfer and transformation of matter and energy.
Essential Question:
Enduring Understandings:
|


