
Investigation 3 - Plant and Animal Experts
| Class Time Required |
Activity 3A: 1-2 class periods |
| Materials Needed |
|
| Teacher Preparation | Do research and gather information about local marine/aquatic plants and animals. Acquire and organize books and materials. Make up examples of a large animal sculpture, a wheel book, and a riddle to show students. |
| Prior Student Knowledge |
Students should know the ABCs, and have some prior experience with a class research project. They should be able to work with large paper and use tools for cutting and stapling. They will need to know how to use a paper fastener (brad). |
| Vocabulary |
adult, answer, clues, cut, details, developing, draw, information, larva, life cycle, paint, research, riddle,staple, stuff, tide Names of local plants and animals and their features. |
| Science GLEs Addressed |
A1, A2, C2, G3 |
 Overview: In this 9-12 day investigation, children begin by continuing to learn about the wide variety of aquatic plants and animals in their region. Each child then chooses a special plant or animal to research, depict, and share with the class. They go on to learn more about their special species and others as they explore life cycles and tide-related behaviors, and end the investigation by making and sharing plant and animal riddles.
Activity 3A: ABC Sea/River Book
(1-2 class periods)
Focus Question: How do we show what we know about a plant or animal?
Engagement (15 - 20 minutes):
Read The Ocean Alphabet Book (or another alphabet book that best matches your local environment.) Brainstorm local aquatic plants and animals that students can include in their class book. Emphasize the use of the beginning sound, and make a list of animals or plants by each letter. Children can choose which plant or animal to describe on their page.
Exploration (20 minutes):
Use large, 12 x 18 sheets of paper that can be laminated, spiral bound, or fastened together with three rings. Provide drawing, writing, and coloring materials, and ask students to draw their plants or animals, paying attention to details. Have them include the upper case letter, the lower case letter, and a sentence (or more) about the plant or animal (provide scaffolding with a sentence frame). Those who get done early can make another page. Observe children as they make their pages, encouraging details and interesting information. Remind children that many people will use the book and they will want to do their best!
Explanation (30-40 minutes, or spread out over several days)
Have each student share their page, naming their animal or plant and reading and telling what they know about it and how it is used. Students can ask each other questions and the teacher can encourage discussion of plants and animals.
Elaboration (20-30 minutes):
Provide “mini-books” or paper, and drawing materials for students to make alphabet books of their own.
Evaluation
Observe children’s success with the activity, using notes or a checklist to record their ability to notice details, their knowledge of local plants and animals, and their communication skills.
Activity 3B: Plant or Animal Research
(5-6 class periods)
Focus Question: How can we find out more about one creature?
Engagement (20-30 minutes):
Read a nonfiction book about a local sea or freshwater creature. Model your enthusiasm and excitement for learning about a local animal. Then, take time to brainstorm marine and aquatic animals that the class might observe on their upcoming field trip to the beach, river or lake. Ask children to think about an animal they would like to research. They will become the class expert on that animal, and after they complete their research they will teach their classmates about the animal. On a class list, record the animal each student has chosen. Remind students that scientists learn by reading, writing, and researching about information that is interesting and useful to them.
Exploration (30-minutes):
Display a large variety of books, posters, and other visual images in the classroom. Students will use the books and posters, the Internet, guest biologists, and local knowledge to research their local marine or aquatic animal. Include questions for research on glue-in organizers for the students’ science notebooks, which may include the following:
• Name of animal.
• What does it eat?
• Where does it live?
• How does it move?
• How does it get food?
• How does it protect itself?
• Something it does that few other animals can do.
• Use five words to describe it.
• Tell who uses it and how it is used.
Explanation (One or more 30-minute sessions):
Ask each student to draw a picture of their animal in their science notebook. They will organize their information from resources to document their thinking and create a research area in the science notebook that they can later share with others. To prepare for sharing information, children might also make a small puppet on a brown paper bag to show a visual image of the animal.
Structure the order of student presentations so that animals from the same group (mammals, invertebrates, etc.) are together. After a group of researchers have presented information encourage children to talk about how these animals are connected. What characteristics, similarities, or differences help us to classify them? Refer back to the class chart from Investigation 2C and expand it or make a new one to include marine mammals, fish, and other kinds of animals presented. Support children to make connections to prior experiences, use of resources and their own information that they’ve gathered.
Elaboration (Two or 3 30-40 minute sessions):
Tell students about the culminating celebration and choose one child to describe their particular creature. Then, with the whole class participating, help that child to imagine and describe how they would make a large size paper sculpture of the animal. Discuss the idea with students – “if I was to make this creature, what would I need? How would I begin?”
Model the creation of the sculpture. 
Use large paper and a picture to support observational drawing.
One step at a time, show students how to:
1. Draw the form of the animal.
2. Cut out the animal on the lines.
3. Staple paper so there are two sides together, with just a couple of staples.
4. Paint or use markers to draw details (eyes, gills, fins, wings, etc.).
5. Staple carefully all around, leaving one gap to stuff the creature.
6. Stuff by putting newsprint into the gap, then staple it closed.
Have students spread out in the room, or have students work in teams to create one sculpture per small group at a time. Students will use the information from their marine/aquatic animal research to create the sculpture. Encourage children to talk about the specific characteristics of their animal; number of legs, shape of body, use of appendages, etc. The plan that students make is important since this will be the information that is used to inform guests and others of research.
Students will present the finished sculpture first to the class or in small groups. Students can describe the process and how they decided what details to include. This is practice for the information they will give to visitors, guests and scientists that come for the final celebration! Discuss how the sculptures are similar to the real animal or plant, and how they are different. What new details did students learn about their animal or plant as they made their sculptures?
Hang the sculptures with fishing line, make them into a mobiles, or just use them to display the forms of creatures for others to see. Students will explain their research and visual details of their creature to guest, family members and others.
Evaluation:
Evaluate through observations of student work and science notebooks, and use a child-created rubric for evaluation of sculpture and presentation of information.
Activity 3C: Life Cycle Wheels
(1 class period)
Focus Question: What is the life cycle of local plants and animals?
Engagement (10-15 minutes):
Sing the song “Everything Grows” by Raffi or read the book by the same title. Ask students what they know about the local animals and how they grow and change. Tell students that all animals have a life cycle. Show the class a Life Cycle Wheel of a local aquatic animal, and ask “What do you notice as the wheel turns?” Have a discussion about what the children notice. Explain that they will get to make their own wheel that shows the life cycle of an animal!
Exploration (15-20 minutes):
Select five options that children can choose for their “wheel book” (fish, crab, snail, clam, mosquito, aquatic insect, urchin, etc). They will cut out the pictures of the developing stages (from egg to adult) and paste them onto the wheel, color the inside of the wheel, and decorate the outside of the folded life cycle wheel book. Give children books to look at and other resources to encourage them to think about the animal’s habitat and about how they will decorate the outside of their wheel book. Life Cycle Stages examples.
Explanation (15 - 20 minutes):
Children will share their wheel books with each other as they finish. Groups of children can then share in the large group as you guide the discussion of the life cycle of each animal. Help children notice similarities between animals – and differences, too. Can they think of other life cycles not used within these wheels?
Elaboration:
As homework, have children take their wheel book home and explain it to their families. Together can they come up with a different animal, or a plant, and draw the life cycle at home. They might do the life cycle of the animal that they researched in the previous activity. It might be useful to have a blank form or a circle cut-out that they can take home.
Evaluation:
Listen as children describe their animal’s life cycle. Are they in the correct sequence? Can they describe how a creature develops? What features of the animal make it unique as it grows and changes? What kind of connections to other life cycles can they make?
Activity 3D: High-Tide, Low-Tide Game
(1 class period)
Focus Question: What different things do marine animals do at high tide and at low tide?
Engagement (10 minutes):
Read a book about the tides. Ask students: What do you know about the tide? What do you notice when the tide is high? What do you notice when the tide is low? What do you think happens to tide-pool animals and plants when the tide is high? What do you think happens to plants and animals when the tide is low or out?
Exploration (10 minutes):
Tell your students: We are going to play a game called: High-tide, Low-tide.
I’ll say the name of an animal that lives near the tide line. It will be an animal that spends some of its life exposed at low-tide and some of its life covered with water, at high-tide. To begin with I’ll describe how the animal moves and feeds at high-tide. Then I’ll describe how the animal protects itself and behaves at low-tide.
Here’s an example: A Barnacle. You are a barnacle. You have glued your shell to a rock and you sit upside down in your shell house. Each shell house is made of six hard, crusty, plates. When the tide is high the barnacle opens its movable shell plates and throws out its curled, feathery legs. It uses its curled feathery legs to sweep the sea soup for tiny plants and tiny animals and kick them down into their mouths. At low-tide the barnacles show no movement or sign of life. The six hard, crusty shell plates close up tight. The barnacle’s shell makes a moist house and keeps the animal cool. The barnacle sits upside-down in its cool shell house with its head cemented to the bottom and its long feathery legs curled up tight.
When I say: high-tide show how a barnacle behaves at high tide. When I say: low-tide show what a barnacle does when the tide is low.
Here’s another example: A Limpet. At high-tide the limpet moves about scraping and scraping the rocks with its tongue. A limpet tongue is like a long ribbon covered with very fine teeth. The limpet creeps along scraping and eating on the thin layer of tiny green plants that covers the rocks. At low-tide, a limpet out of seawater does not scrape the rocks for tiny green plants. It pulls its head and the two long feelers inside its cone-shaped shell house. With its wide muscular foot it plasters itself to the rock with very tight suction. The limpet’s cone-shaped shell protects it from hungry crab, sea stars and shore birds and it makes a moist pocket for the animal inside its shell.
When I say: high-tide show how a limpet behaves at high tide. When I say: low-tide show what a limpet does when the tide is low. “
Explanation (10-20 minutes):
After students have acted out the examples, ask them to think about the marine animals and plants that they’ve learned about and what they would be doing at high tide and low tide. What are their unique ways of ‘eating and moving’? Ask students to share what they know, and allow them to do more research if needed. Have each child draw a picture of a plant or animal at high tide and at low tide, in their science notebook, using the High Tide, Low Tide glue-in.
Elaboration (10-20 minutes):
Invite students to ‘teach’ and lead this game. Allow a student to be the leader and describe how their animal behaves at low-tide and high-tide, while other students act it out.
Evaluation
Observe the students’ work in their science notebooks and their actions during the activity.
Activity 3E: Marine/Freshwater Animal or Plant Riddle
(1-2 class periods)
Focus Question: How do we identify animals based on their characteristics?
Engagement (10-15 minutes):
Read an animal riddle to the class.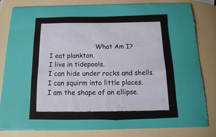
For example:
I float near the surface of the water.
I eat zooplankton and fish.
I’m eaten by fish, sea turtles.
I have sticky stuff on my tentacles that captures and paralyzes prey.
I defend myself with stinging cells on my tentacles.
What am I? (Jellyfish)
Continue reading a few more examples until children begin to get ideas for their own riddles. Encourage children to share their riddle ideas, helping them to understand that the clues are important.
Exploration (10-20 minutes):
Students will use the information from their marine/aquatic animal research or from another student to write a riddle, using the frame in their science notebook. Ask children to read their riddles to their classmates. Encourage children to use all of the information that they’ve learned as they read and write riddles.
Explanation (30 minutes):
Prepare riddles for a display so other students and guests to the school can learn about each animal. Encourage students to make an attractive ‘border’ around their clues. The border should include small pictures illustrating the clues in the riddle. (For example, they could have pictures of plankton, fish, and water for the jellyfish riddle). Each student will also draw a detailed sketch of their animal.
The riddles can be displayed in the hall – having the written clues on the top page with the answer and a picture on another page underneath. Invite other students and teachers to read the riddles and guess the animal. Students play the role of scientist and feel empowered when they notice other people enjoying learning from their animal riddles.
Elaboration:
At the final Alaska Seas and Watersheds Celebration students will invite others to read and puzzle over their riddles. Tour guides can be used to show how to make a prediction and then lift up the flap to check their thinking! Students can be encouraged to continue making riddle books to display in the hall, especially after they have had their field session and might have more clues to add.
Evaluation:
Use a checklist to help students evaluate their own riddles.
Does my riddle make sense? Are there enough clues to help others solve it?
Teacher Preparation:
|
Tips from Teachers |
|
Sybil VanDerhoff created this ABC book template. Thanks Sybil! Use a "research guide" to focus the class research leading up to the riddles and the sculptures. On a large piece of paper for students to use, give prompts for research like "size", "color", etc. |
Read through the investigation and the Teacher Background section. Do research and gather information about local marine/aquatic plants and animals.
Acquire and organize books and materials. Make up examples of a large animal sculpture , a wheel book , and a riddle to show students.
Curricular Connections:
Activities in this investigation connect to literacy, reading, and writing as students listen to books, make a book, do research, and write riddles. They also develop language arts skills as they present information and speak. There are many opportunities for students to learn about art through drawing and sculpture-making activities. Spatial skills and a sequencing activity enhance math skills. As they act out animals at high and low tide they gain experience in movement (PE) and drama. In addition, this investigation gives students many opportunities to learn and practice collaboration and teamwork skills.
| Student Handouts |
Science notebooks Science notebook glue-ins for:
|
| Items for Group Display |
The Ocean Alphabet Book, and/or other alphabet books Everything Grows book, by Raffi Everything Grows (album or MP3 download), by Raffi A book about tides Life Cycle Wheel (Directions for the wheel book |
| Material Items |
|
| Facility/Equipment Requirements |
Laminator |
Alaska Science Grade Level Expectations Addressed:
In Investigation 3, First Grade students begin to build toward these K-12
Science as Inquiry and Process
(A 1) develop an understanding of the processes of science used to investigate problems, design and conduct repeatable scientific investigations, and defend scientific arguments.
(A2) develop an understanding that the processes of science requires integrity, logical reasoning, skepticism, openness, communication, and peer review.
Concepts of Life Science
(C2) develop an understanding of the structure, function, behavior, development, life cycles, and diversity of living organisms.
History and Nature of Science
(G 4) develop an understanding that advancements in science depend on curiosity, creativity, imagination, and a broad knowledge base.
Essential Question:
Enduring Understandings:
|


